Info explanations and tips and tricks for the Star Wars X-Wing flight simulator
| distribution | platform | Published | Playable OS | requirements | emulator manual |
|---|---|---|---|---|---|
| Lucas Arts Softgold Totally Games |
PC | 1993 | DOS | 80386 processor 1 MB RAM VGA card 10 MB HDD |
Dosbox manual |
| Lucas Arts Softgold Totally Games |
Apple Macintosh | 1993 | Mac OS 7.1 | Motorola 68040 8 MB RAM VGA card 10 MB HDD |
??? |
| CD-ROM Version: | |||||
| Lucas Arts Softgold Totally Games |
PC | 1994 | DOS | 80386 processor 2 MB RAM VGA card 10 MB HDD |
Dosbox manual |
| CD-ROM Windows(Collectors) Version: | |||||
| Lucas Arts Softgold Totally Games |
PC | 1998 | Windows 95 | Pentium 100 MHz 16 MB RAM DirectX 3 card 30 MB HDD |
Maybe with VMware |
| Special Remasterd Edition: | |||||
| Disney Steam GOG |
PC | 2014 | Windows XP/Vista/7/8/10 | 1.8 Ghz 1 GB RAM DirectX 7 card 216 MB HDD |
not required |
Differences of the versions
Grafikvergleich| X-Wing Classic | X-Wing Collectors CD-ROM | X-Wing Special (Windows) |
320x200 |
640x480 |
1920x1080 |
320x200 |
640x480 |
1920x1080 |
320x200 |
640x480 |
There are no Wingmen ! |
320x200 |
640x480 |
1920x1080 |
| function | X-Wing Classic Floppy | X-Wing Collector CD-ROM | X-Wing Special Windows |
|---|---|---|---|
| sound |
|
|
|
| Ingame |
|
|
|
Control
Flying and aiming is much easier with a joystick than with a gamepad. At least that's how I feel. On my joystick I use many keys, so you can capture enemies faster or adjust the speed of the target. The keyboard layout looks like this:Control
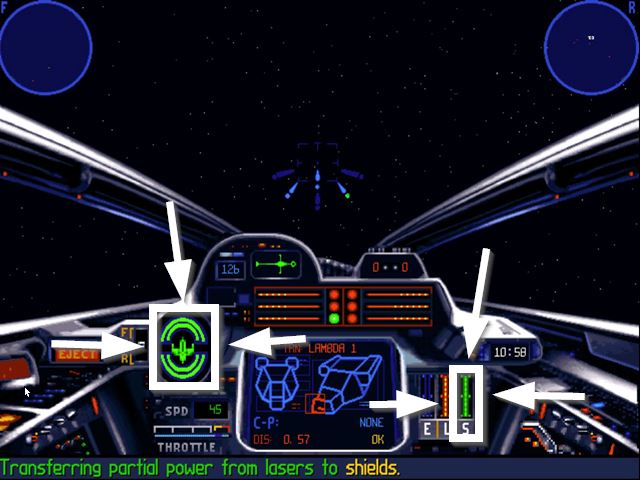
| Laser guns / ion cannons KEY F9 KEY X The laser weapons can be controlled in the same way in every spaceship. There is an indicator at the crosshairs for each laser cannon, this shows which cannon is currently selected and whether it is ready (green dot) or whether it is currently firing (orange dot). A thick red dot means double firepower, a small red dot means single firepower. The condition of the laser cannons results in a different sound effect when you shoot this weapon. The charge level can be seen above the big "L" in the picture, all conditions above the middle setting will discharge the weapon. The middle state holds the charge, all settings below hold the charge. The charge of the laser weapons can be adjusted with the key "F9". You can switch the laser cannons together, so that all cannons of a ship can be fired simultaneously. On the standard keyboard layout this is the key "X". |  |
||||||||||||||||||||
Shield / Deflector Shield KEY F10 KEY S The shields are different for every starship. Details can be found in the game's tech room. The shield strengths differ from the game Tie Fighter. The charge power of the shields can be controlled with the key F10. 2-3 times. With the key S you can split the energy of the shields to front / back or to front and back. The shield strengths of the spaceships are as follows:
|
 |
||||||||||||||||||||
Pilot Editor
There is a ready programmed Pilot-Editor, with which you can change all orders, points etc. of a pilot.| Call the following link to &oopen the github repository of the programmer: https://github.com/j-mathes/X-Wing-Pilot-Editor After that you have to change to the subfolder X-Wing Pilot Editor Setup. |  |
| This is where you have to download the two files and save them together in one folder. | 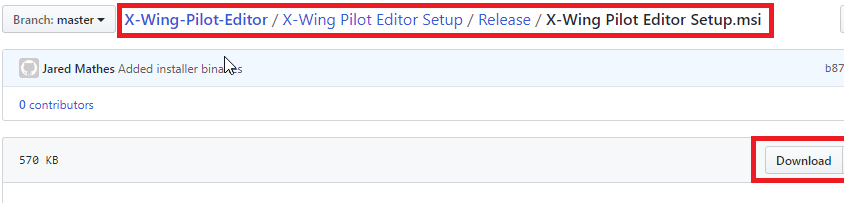 |
Continue to start the .EXE file, the editor ö opens in a window. Now you have to load the pilot file you want to edit. The pilots for the Steam or GOG version can be found in the respective subfolder of the version you are playing. With Steam for example: |
 |
| Attention ! | If you resurrect a pilot, i.e. if he was captured or killed and you set the status to "Alive", then you have to sign up for the campaign again, you continue the game at the last mission you have completed. |
A list of what HEX value means in a pilot file can be found here Download HEX Editor X-Wing pilot manual.
Download & Infos
Manual for X-WINGInstructions HEX Editor X-Wing Pilot